Category: Employees
Employee Time
Did you know that SP-1 can print the employees hours every time they clock out? This will show them their clock in and out times for the shift as well as a total number of hours worked.
It’s a great way for employees to keep track of their own hours.
This option can be found in System Setup, Operations:1 and then select Print Employee Hours Summary on Clock Out.
Posted in Employees Tagged with: clock in, hours, time keeping
Employee Scheduling with SelbySoft
Over the years we have been asked about doing an employee scheduling program. It’s not that we don’t think scheduling is important, it’s just that something has always taken precedence. Finally, we have been able to find a development spot to get this done! This is a FREE upgrade for any of our customers that are current on a support plan.
Schedules can be set by employee for the current week and the next week. The schedules are checked for time overlaps as well as potential overtime issues. Once the schedule is in, it can easily be duplicated for the next week. A number of new reports have been added that allow for printing of master schedules, individual schedules and blank schedules.
Once your employees are setup on the schedules, SP-1 will stop them from clocking in before their scheduled clock in time! You can set the grace period for this action in SP-1.
For Example: Let’s say the grace period is set to 10 minutes. Sue is on the schedule from 8am to 1pm. She arrives at 7:30am and starts to chat with the fellow employees and hang out. Prior to the scheduling system, Sue could clock in and waste 10-30 minutes of payroll.
Now, when Sue clocks in, the system will ask for a manager password if she is more than ten minutes early!
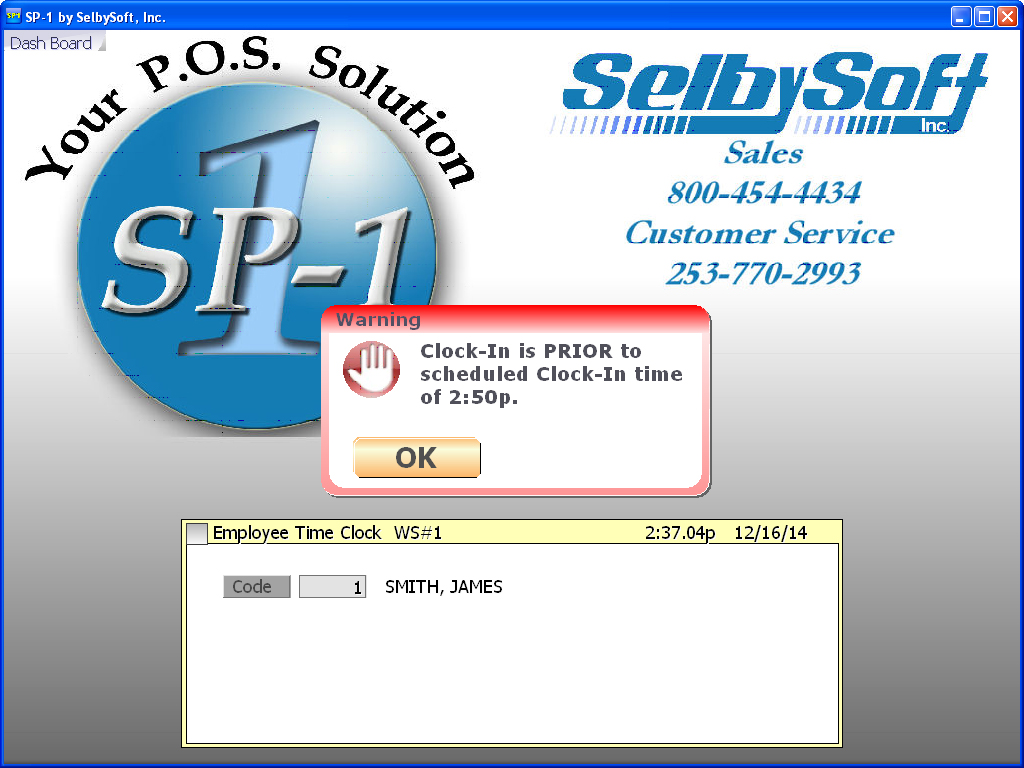
Clocking in with scheduling.
Posted in Employees, Order Entry Tagged with: scheduling
Are You Being Cheated?
Have you heard of Buddy Punching? You might not be familiar with the term but you have probably experienced it in your store.
Buddy Punching is when an employee has their buddy clock them in or out. This results in time keeping theft. In other words, you are paying an employee when they are not in the store!

7/25/14
Desc Employee Date In Time In Date Out Time Out WS
Bef.Edit 1 SMITH, JAMES 7/25/14 2:05p 7/25/14 2:14p 1 ( 2:15p 7/25/14 7)
Aft.Edit 1 SMITH, JAMES 7/25/14 2:05p 7/25/14 4:00p 1 ( 2:15p 7/25/14 7)
Posted in Employees, theft Tagged with: audit, fingerprint
Saving on Delivery Driver Payroll
If you have delivery drivers then you probably have this issue:
Your insurance company bills you higher fees for your delivery drivers. With one of our customers, the example was $2 per $100 in payroll for staff and $7 per $100 in payroll for delivery drivers. The issue that comes up is that your drivers are not actually driving for the whole time they are on the clock.
Utilizing our XML Ticket export in SP-1, we have the ability to gather data that can let us help reduce your costs. This export let’s us see the total number of deliveries, total time on the road and average time per run. The most important is the total time on the road. In one example with a customer we found that their drivers spent a total of 2,830 actual hours on the road.
When we calculated the insurance rate based on hours on the road and not based on hours clocked in we found a difference of over $1,100!
Want to take a look at this? Give us a call!
Posted in Delivery, Employees Tagged with: delivery, insurance
Decrease Theft with Cash Accountability
Cash accountability is one of the things that sometimes gets a little overlooked when people are looking for a POS system. It’s one of the key components of any good point of sale however.
What we want to do is keep the employees honest when it comes to handling the cash.
It all starts by deciding who has access to the cash in the drawers throughout the day.
First we can ask ourselves some questions about the cash drawer in the store:
Can anyone access and handle the cash? Is the key left in the drawer?
Is there a cashier that is dedicated to handling the cash each shift?
The heart of the problem for most stores is that there are just too many people with hands in the drawer. When the drawer is short at the end of the night – who do you question?
In order to be a little more accurate we must first really lock down the drawer. Take the key away and assign the drawer to an employee. Make it their responsibility. This helps insure employee accountability because only that employee can access the cash. The only issue here is that the cashier may not always be available when a customer arrives and is ready to order. We solve this by:
Setting the system up to allow only the employee assigned to close out the drawer. All other employees can start a ticket but only one employee can cash out the customer.
We can also setup multiple cash drawers per order taking terminal. We support up to five but two is probably enough. In this case you assign each employee to their own drawer. Then you know which employee is short and why.
With either method, you will be on your way to eliminating the potential for shortages in your drawer and increasing employee accountability.
5 Ways to Secure Your SelbySoft System
I know that security is never fun to talk about. People hate thinking about theft. So let’s call this a conversation about ‘preventative maintenance’ instead.
1. Don’t have the same employee code for everyone. Have the employees use an individual code for clocking in and for taking orders. It does not take much to setup and it’s not that hard for employees to get.
2. Go through your security settings and make sure that employees don’t have the ability to re-open tickets or void tickets once completed. While you are at it, make sure it takes a level 9 security to change security levels!
3. Check that you don’t have any 100% or open discounts without security. If you do, place a manager or owner level security on them.
4. Don’t let employees open the cash drawer with a key. It only leads to problems with the cash.
5. Check your audit reports as well as your employee summary report every once in a while. When employees know you are on top of things, they are less likely to try and steal.
There you go, five short, easy methods of security that you can implement.
Posted in Employees, Order Entry, theft Tagged with: security, Theft
Security in SP-1
Every year we hear about some firm that has a huge credit card breach. Usually it is some targeted event that involves a team of hackers to steal all the credit card information. What we don’t hear about are the smaller, more personal attacks that cost small businesses money each year.
I went back through my notes from last year and found that I personally heard stories that added up to around $50,000 in theft from owners. That does not include the conversations other people in our company have with our customers. Some of this is theft of time (clocking in when not there), employees handing out free or discounted drinks, ticket edits and voids, inventory theft etc. One of the most brazen was the manager who simply took money from the till at night ($10-$30) and then told the owner that the reports must be wrong!
As you can imagine, a lot of this theft is somewhat avoidable. Here are some things you can do to insure you are not being taken advantage of.
- Upgrade to version 7.60 or higher of SP-1. In Version 7.60 and higher, the password storage has been encrypted (more so than before) so an employee can’t skim the passwords directly from a data file. Additionally, 7.60 and up require ‘strong’ password rules.
- 7 or 8 character passwords.
- Must have a combination of letters and numbers.
- Forced to expire every 90 days.
- You can’t reuse a password that has been used in the last 4 times
- Start using employee swipe cards. Those are better than having someone see your password and code. Better yet, spend the $125 and upgrade to a fingerprint id system.
- Make sure that employees are using their own unique log in. Please, don’t have a ‘cashier’ code that everyone shares!
- Review your security. Does every employee need complete access to everything?
- Close out the drawer between shifts. This will really help make your employees aware that you are on top of things.
- Think about a blind shift close. With a blind shift close, your employees don’t know what is supposed to be in the drawer.
- Institute assigning employees to the cash drawer if possible. If you limit access to the cash, you limit access to stealing it. While you are at it, setup multiple cash drawers if needed.
- Review your reporting.
- How many voids and edited voids are happening? If these numbers increase, start looking more closely.
- Run the employee summary report and see which employees have more voids. Look for significant differences.
- Check your hourly time audits and see if employees are changing their hours. Then go back and review your security again!
- Check your ticket audits. Are employees voiding tickets after the fact?
- Sign up for MobileDash. Get hourly reports as well as alerts on voids, edits and reductions.
Posted in Employees, Order Entry, theft Tagged with: passwords, reporting, Theft
Drive Thru Coffee Shop Features
Do you own a drive thru coffee shop? Have a drive thru window? If so, SP-1 by SelbySoft has a few ways to help you.
Drive Thru brings a unique challenge to a location. Speed becomes more important when taking orders and you have to worry about cards stacking. SP-1 by SelbySoft has a couple of ways to handle this.
There are a couple of different ways to be setup with a drive thru:
- Single Station but two windows or a window and a counter: In this configuration you will use our ‘On Hold’ feature. Once the order is taken, it is placed On Hold so other orders can be placed in SP-1. Then when the payment is ready, the order is taken off hold and paid for.
- Drive thru with a speaker outside: This can be handled two different ways. First, you can use the On Hold feature to take the order through the headset, place it On Hold and then take the next order. When car one reaches the window, you take the order off hold and close the transaction. The On Hold screen shows the orders in the order they were taken. The second way is to add another POS with our order confirmation system. This allow one person to take orders quickly from the headset and the other person to close out the orders with the On Hold syste

Order Confirmation Monitor

Putting an order On Hold

Choosing an order off the screen.
Posted in Employees, Order Entry Tagged with: drive thru
Enhanced Customer Service with SelbySoft
We all want to be that company that knows our customers by heart. Unfortunately, sometimes it can be difficult to remember everything about everyone! If you are using our built in gift and loyalty system, you can get SP-1 by SelbySoft to help you!
It starts with the gift card because that gives you a reasonable reason to ask for a customers name, address, phone, email or anything else you want to track. Not interested in the marketing features? Not a problem, simply collect only the customers name. Once you have this, you can assign their gift card to their name in SP-1.
In SP-1, you can now simply type the customers name or swipe their gift card and SP-1 will pull up their last order. Along with the order, you will have buttons to duplicate their last order and even custom notes about that customer! This makes it very easy for your employees to comment on the last order the customer had.

Posted in Employees, Gift Cards, Marketing Tagged with: customer, gift card, marketing
Employee Job Classes in SelbySoft
Do you ever have one employee that works for a different wage depending on the job they do? This can be common when you have one employee that works occasionally as a cook, driver, barista etc. In these cases, it may be desirable to setup a job class with a 2nd wage amount.
With Job Classes, you can have up to five different wage amounts per employee. If Bill works as a driver, he may be paid a smaller wage plus tips. When Bill works in the kitchen, he may receive a larger wage but no tips. on the right hand side.

Posted in Employees, POS Features, Reporting Tagged with: job class, wage