Category: Order Entry
Discounts
SP-1 is a pretty powerful program. One of the things that makes it so powerful is the flexibility on the little things. I thought it would be beneficial to cover the different ways you can setup a discount in SP-1.
This blog was inspired by a conversation with Mark at Blackstone Pizza in Iron Mountain MI. Mark had some questions on how to manage discounts with his employees.
First, remember that you can have unlimited discounts in SP-1. Each discount can be setup to only discount a specific item at a specific time and a specific day! So, you can actually setup a discount that would give 10% off sandwiches on Tuesdays between 2pm and 4pm. That discount would only work at that time.
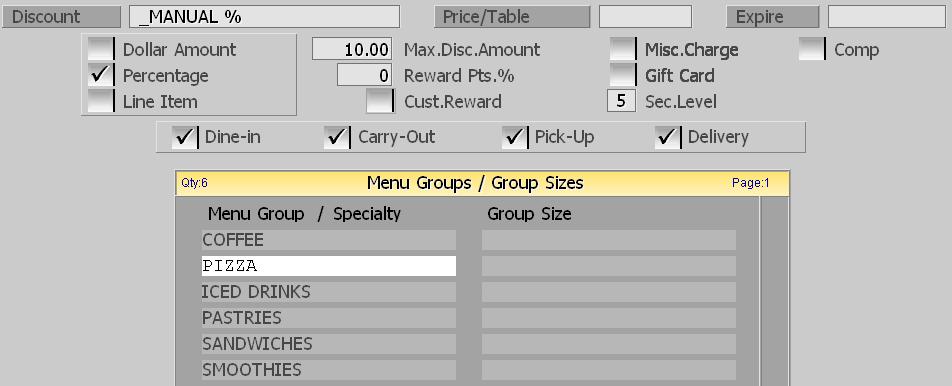
I’ve included a screen shot of a discount that we use in our demonstrations:
All discounts in SP-1 are a dollar or percentage off an item or items. Let’s cover some of these fields and see how they work.
Discount: This is the discount name that is used. This is how the discount is identified on reports and on the order screen when it is used.
Price/Table: Enter a price ($10.00) or price table in this field. If you use a price table, you can limit the discount to certain times of the day or even days of the week. There are three ways this works:
1) Percentage discount – the amount entered here is a percent.
2) If you are setting this up as a dollar amount discount then this will be the amount that the discount is for.
3) If this is left blank, then it is a manual discount. Manual discounts require the employee to enter the amount to be discounted. Usually not something that you want to leave without a security level.
Expire: This discount will no longer be available 30 days after this date.
Dollar Amount: Select this to have a dollar amount discount. If you had entered $10.00 into the Price/Table field, then this would be a $10 off discount.
Percentage: If this is selected, SP-1 will use this as a percentage discount. If you had entered $10.00 into the Price/Table field, then this would be a 10% discount.
Line Item: Line item is a special percentage that will only apply to one specific item on the ticket. This is a great way to discount a specific item in the case of a mistake.
Max.Disc.Amount: With this, you can enter the MAXIMUM amount an employee can discount! In the example above, you can enter any discount amount up to 10%. It’s a great way to limit what employees can discount.
Reward Pts.%: Setting this to zero means that any items that are discounted are excluded from the rewards! This stops “double dipping” for those of you doing buy 10 get 1 free programs.
Cust.Reward: Select this if this is a reward discount. Reward discounts are used with the free gift and loyalty system included with SP-1.
Misc.Charge.: Can you discount a miscellaneous charge.
Gift Card: Can you discount a gift card sale. This is very powerful as it allows you to be able to discount gift or pre-paid cards that customers purchase.
Security Level: Yes, you can password protect discounts. This is important so employees don’t use discounts they are not supposed to use.
Comp: This will allow you to setup a specific discount that is used to ‘comp’ a customer. This discount option affects your server and delivery close outs as well.
Dine In / Carry-Out / Pick-Up / Delivery: These switches set the discount to be order type specific. If you want a carry out only discount, this is how you would do it!
Menu Items: This is where you specify, exactly, what items are allowed in this discount.
Don’t hesitate to tell us how you use your discounts or if you have any comments!
Posted in Employees, Order Entry, POS Features Tagged with: discounts
Caller Id for Deliveries and Pickup!
Do you take phone orders? If so, you can save your staff time by implementing a Caller Id system. SelbySoft has a fully integrated Caller ID system that allows your employees to see who is calling in!
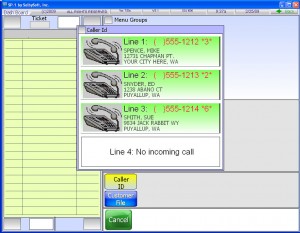
This caller id system will appear when the phone rings. SP-1 will show you the customer name and phone number. If that customer is already in your customer database, the address will be shown as well.
When you select the appropriate button, SP-1 automatically pulls up the customer and shows you their information and last order. That eliminates having to enter the entire phone number when you answer the phone.
If the customer is not in the database then you have the option to add that customer. Once you add, the name and phone number information are automatically added to the customer file by the caller id system. That eliminates having to re-type that information in.
Give us a call if you would like to explore this option more fully! There are some neat little factoids for you about Caller ID below!
 Theodore George “Ted” Paraskevakos from Greece, was the first person to patent caller id technology. This happened in 1968. From 1969 to 1975 he was granted 20 or so patents on that technology.
Kazuo Hashimoto, a Japanese inventor with over a 1,000 patents built the first prototype caller id display. That is now on display in the Smithsonian!
Posted in Delivery, Hardware, Order Entry Tagged with: caller id
5 SP-1 For Coffee POS Tips You Might Not Know
For those of you that have our SP-1 touch screen point of sale system, here are five tips that you might not be aware of.
1. Do you often have an ‘on the side’, ‘extra hot’ or ‘see cashier’ comment? You can create up to thirteen pre-programmed comments to use in the Order Screen. That’s right, you don’t have to have every comment be a manual input. This can be setup in System Setup and then Comments.
2. Last ticket look up. Ever want to re-print that receipt for the customer? Easy. Review ticket and enter 9999. Because SP-1 can store up to 9,999 tickets per day, entering 9999 automatically pulls up the last ticket in the system.
3. Split checks simply. You don’t have to be a table service restaurant to need to split checks. We often hear from coffee shops and quick service pizzeria’s that they occasionally get a large orders. The customer then arrives with three other people’s money in hand and wants the tickets separated. SP-1 makes this easy by allowing you to touch the ticket items
4. Print labels. Actually two different kinds of labels. We can print your retail barcodes and also delivery box labels. Retail labels allow you to use a barcode scanner to quickly ring in retail items. Boxlabels are a great choice for making sure that your delivery drivers are able to see what needs to be delivered where.
5. Send employee messages. That’s right, you can type an internal email in SP-1. Better yet, that email will show up when the employee clocks in!
Posted in Employees, Order Entry, POS Features Tagged with: comments, ecom, split checks, tips
Customer Purchase History
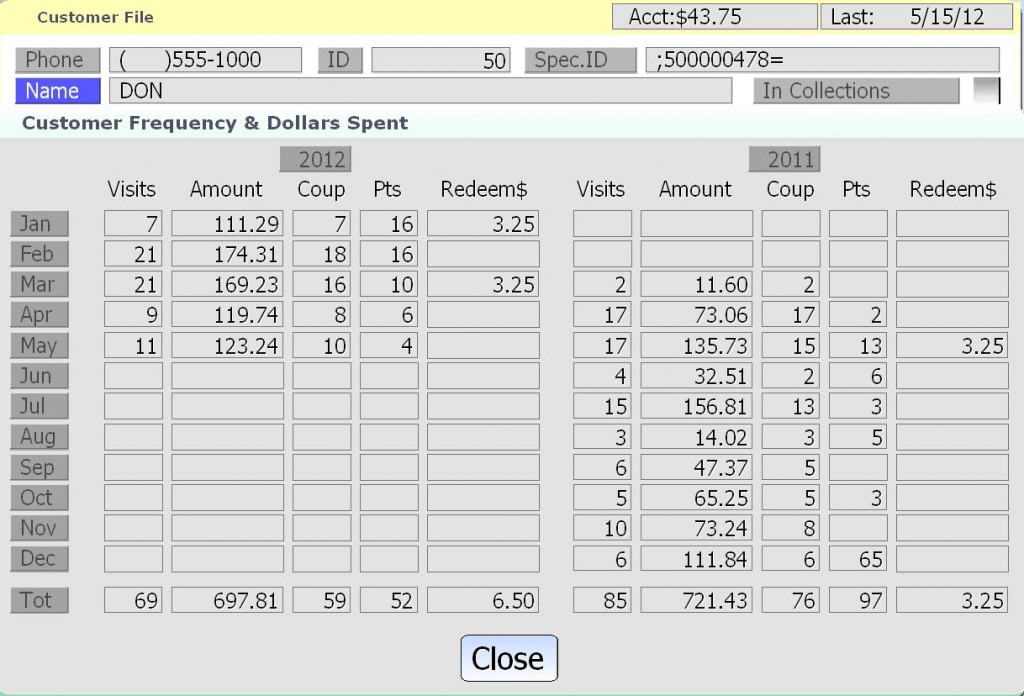
Ever wonder how often certain customers order? What about how much money they spend? If you have SP-1, you have access to as much as the last three years worth of customer purchase history right at your fingertips! Stored in the customer information, is the ability to see this information.
In the image below you can see that we track the following by month:
- Visits: Total number of times the customer visited.
- Amount: Amount of money they spent that month.
- Coup: How many times they used a coupon or discount on their transaction in that month.
- Pts: How many reward (loyalty points) they earned for that month.
- Redeem$: The value of items received through points redeemed.
Posted in Order Entry, Reporting Tagged with: customer frequency
5 Features You Might Not Know About In SP-1!
SP-1 has a ton of features. I thought it would be fun to list a few that many of you might not be aware of!
1) Cash In: Cash in a special transaction type that is found under Misc. Charge in SP-1. Essentially, it is the opposite of a paid out. When you select this option, you are telling SP-1 that you have put money from an outside source into the cash drawer. It can be used in a number of situations including: Recording money earned from a gumball machine or arcade game, putting extra change in the cash drawer and so on.
2) Gift Card Refund: Have you ever wanted to give someone cash back for their gift card? Hopefully not but if you have to, there is an easy way to do it. When you select Paid Out, there is a Gift Card Refund button. That button allows you to swipe a gift card and issue a cash (or credit card) refund for the amount. You can setup a maximum amount to refund in the system setup portion of SP-1. This allows you to issue refunds but only of a certain amount.
3) Use Foreign Exchange: Are you near the Canadian or Mexican border? Do you accept their currency? If you do, this is something you should be using. When this is selected, you can push a button and see what the balance due is in that foreign currency!
4) License Expiration: If you have delivery, then this is for you. In the Employee File, you can enter the date that the employees drivers license expires. When that employee clocks in, you can setup a custom notification if their licence is expired. That will help ensure that the driver is not out representing you with an expired license! As a bonus, those of you without delivery can use this as well for other items. Some people use it to ensure they have a health permit that is up to date for example.
5) Print An Employee Hours Summary: This feature allows your employees to print a slip with the hours that they worked since their last clock in.
There you go. . . five features that you might not have been aware of. Hope they help!
Posted in Employees, Gift Cards, Order Entry, POS Features
Taxes and Your POS
Taxes. . . Not the most exciting topic with a POS but one that people often overlook asking about. Can your POS handle the different methods that you tax items? We are pretty confident that ours can!
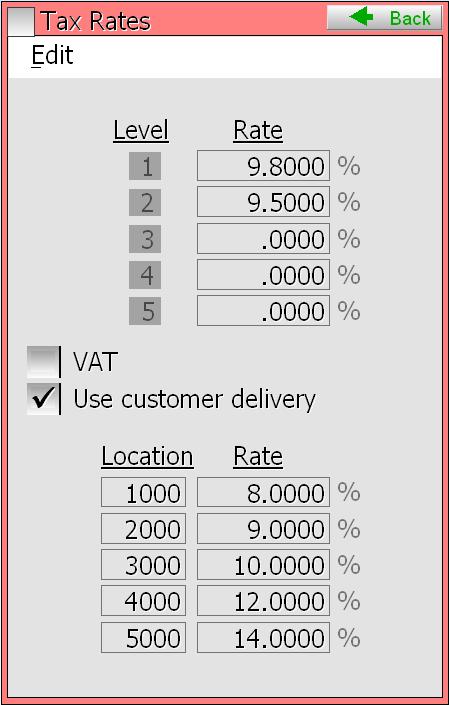
With SP-1 you have five different tax levels. Great right? Well, it gets more complicated than that. We also give you the full flexibility to charge taxes based on the order type (dine in, carry out, pick up, delivery) and by the menu groups (coffee, pizza, sandwich, beverage).
P.S. we also handle Canadian taxes!
Posted in Order Entry Tagged with: tax rates
Customer Confirmation Monitors
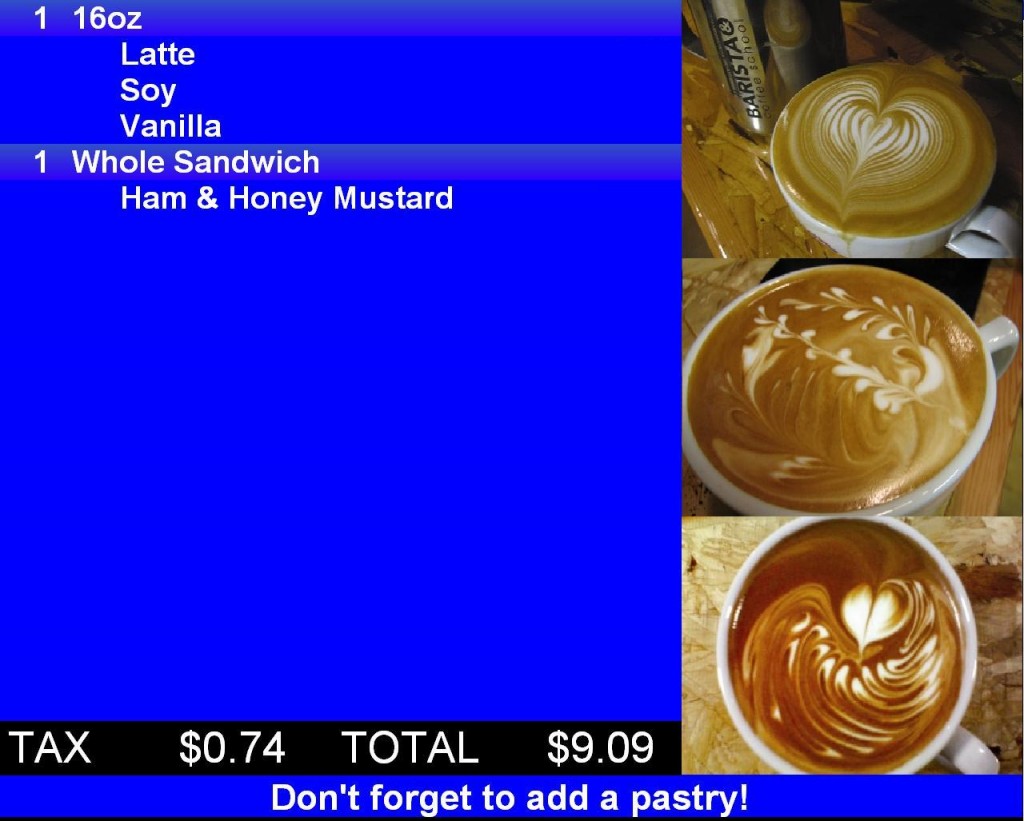
You may know that we have a Customer Confirmation monitor that can be installed with SP-1. This is an option that puts either a 9″ or 17″ monitor that sits on the counter facing the customer. The monitor plays a slide show to your customers and then when you start to place an order, the monitor shows the items and pricing to the customer. It’s a far better option than a pole display.
Since these have been available, we have had some customers ask to have the pricing removed on the screen so that customers don’t see the itemized up charges.
Posted in Order Entry Tagged with: customer confirmation
Get To Know Your Customer!
Here is a feature that is easy for us to take for granted. However, not everyone is aware of it. I thought it would make a nice blog entry.
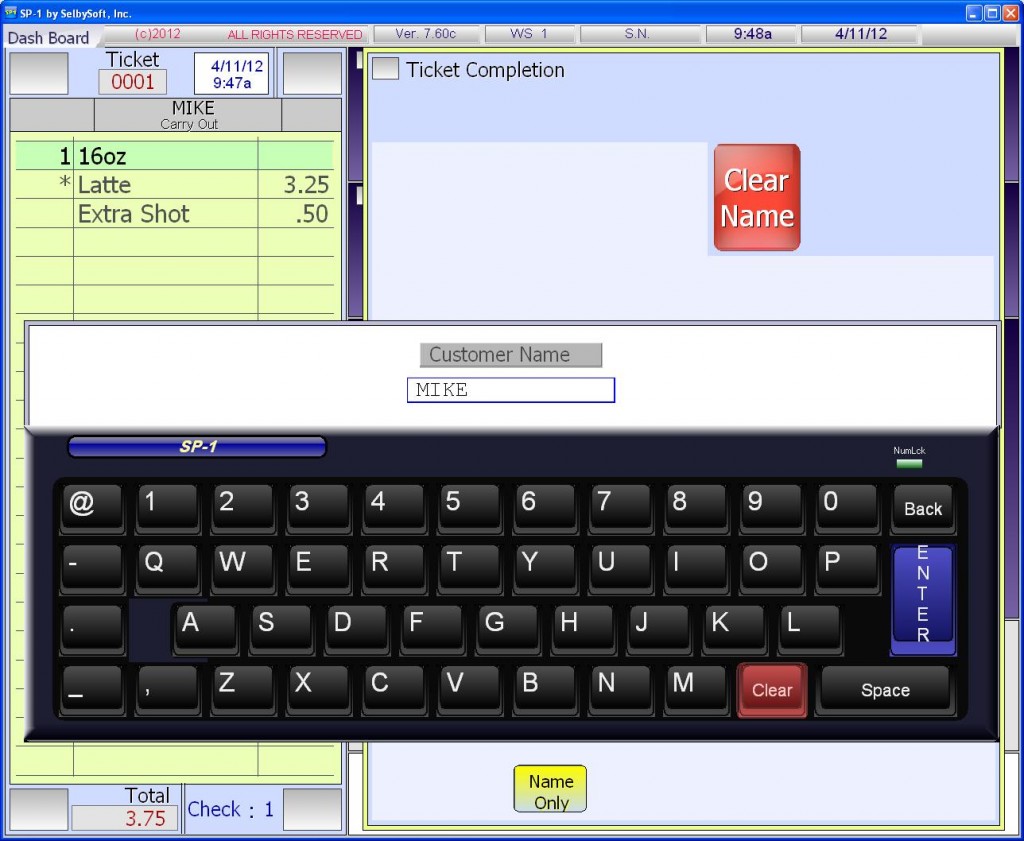
Are you aware that you can ask for a name at the end of each order? This allows your employees to type in the name (usually just the first name) and have that recorded on the ticket. This can add a level of personalization to your transaction as well as help your employees become familiar with your customers.
Sounds simple right? I always like to point out that things are never as simple as they seem on the back end of things. What if you have already pulled the customer up with a loyalty or prepaid card? What if it’s a delivery order or phone order? All of these are accounted for!
If the order has no customer information already and it’s a Dine in or Carry Out, then the name prompt appears. If there is already a customer attached to the ticket, then the name prompt is skipped- You already have it!
If you are doing a delivery order or pickup order, then the name prompt is skipped and you are instead prompted to enter the phone number for the delivery or pickup order.
By the way, the name prints on both the customer ticket and any internal (kitchen / Barista) tickets.
Do you use this feature? Do you use it in a different way? Let us know!
Posted in Order Entry Tagged with: customer name, tracking
Happy Hour Pricing?
Do you run a happy hour? We see that as a great way to help bring people in during the ‘slow time’ of the day. One of the problems with Happy Hour pricing is open tabs. If I start a tab but don’t close the ticket, do I still qualify for happy hour?
It’s up to you! We have two methods of handling this type of pricing:
Base pricing on start time: With this method selected, your pricing on open tabs is based on when the customer opened the tab. This is used to encourage customers to stay at a table and keep ordering. If you offer a $.50 discount per drink during happy hour, this method would extend that pricing until the ticket was closed.
Base pricing on actual time: This is the most common method of these orders. Pricing is based on the actual time that the item is ordered.
Don’t forget that SelbySoft allows up to nine prices per item per day with our price tables. This allows you to have these happy hour prices automatically take effect.
Call us for more information!
Posted in Order Entry, POS Features Tagged with: happy hour, Pricing
Gas or To Go Surcharge
Gas Surcharge & Additional Charges
Do you charge a surcharge for delivery when gas prices shoot up? What about charging a to go or carry out fee?
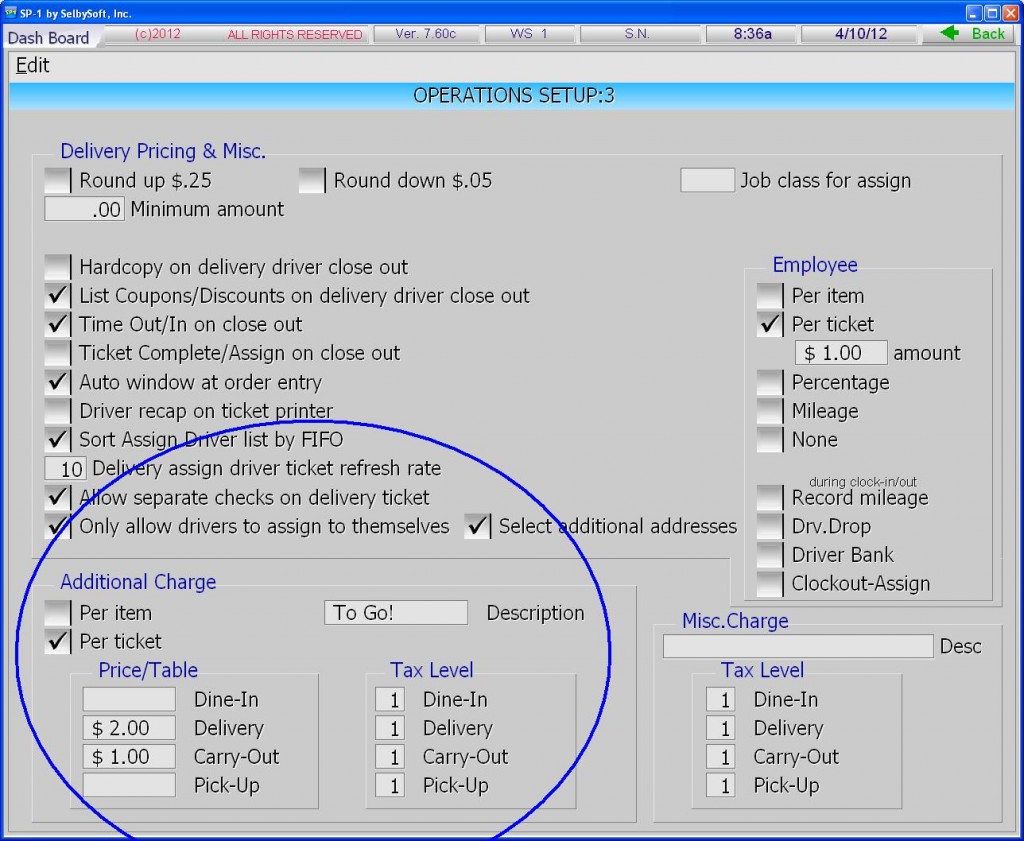
SP-1 can handle both of these situations easily. Because we can track the order type when the ticket is finished, it makes it easy for us to add an additional fee to the ticket based on the order type. In the example below, we are charging $2.00 for each delivery and $1.00 for each to go ticket that we do.
SP-1 can even take this a step further and allow you to charge by the item instead. This would then add a charge to each item on the ticket. This is great for charging $.10 per item on to go or carry out orders!
Posted in Order Entry, POS Features Tagged with: carry out, fees
